Learn Separability, Jobs and Burst to speedup by 60 a slow algorithm in Unity
How to use Unity Jobs, Burst while you learn what a dilate and erode operations are performed on image processing as well as filters and filter separability.I wanted to share a perfect example of how a very slow algorithm can be improved using concepts such us separability (not related to Unity), and furthermore using the Unity Jobs system and then Burst.
The result is this. With and without the improvements.

Yes. You're right, a 50 to 70 milliseconds operation becomes a lot less than 1ms operation. (in editor)
You will be able to see the process step by step tutorial on how to improve a specific algorithm, which is perfect to explain a bunch of concepts.
Table of Contents
The Problematic Algorithm
I've been working on grids for a while and there are many popular operations to perform on them. Two operations that are very useful in grids are Dilate and Erode.
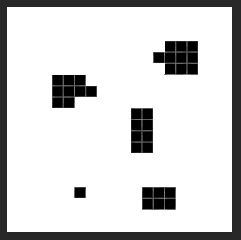
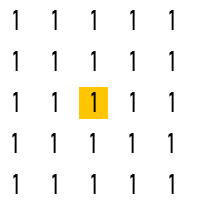
We start with a grid of black and white cells.
Dilation
Sometimes called Expansion, is the operation that, given a grid with cells of two types, generates a dilation of one of the types, converting cells surrounding that type also to the same type, making the area N cells bigger.
If we apply dilation operation twice to the black cells, this is the result:
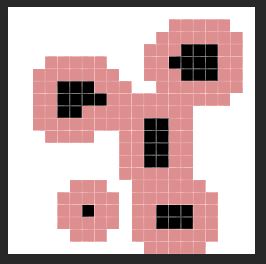
Pink cells are black too, but this way you can see it better.
Erosion
Also called Contraction, is similar to dilation, but the other way around. Applying an erosion operation to the black cells we get this:
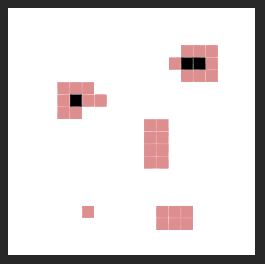
Pink cells are the ones that are removed (so they are white). These operations can be found in any image processing software, like Photoshop. For example, after selecting an area, you can go to Selection / Expand Selection or Contract Selection, to perform an erode or dilate to a given selection by N pixels.
What are these operations used for?
Apart from making areas bigger or smaller, like the Photoshop example I mentioned, they are commonly used in image processing for removing noise, to separate elements or join them or to find bumps or holes... and a lot more.
In my case, each cell tells "has this cell been modified this fixedUpdate?". To store this information, I have a grid of booleans (true or false). They are all set to false at the beginning of a FixedUpdate. Each cell contains a "true" if the cell has been modified after the FixedUpdate. Then I need to "expand" that area by a given number to use that data for other endeavours. To increase the area of the modified cells, I have to perform a dilate operation N times.
Why are these two operations slow?
To perform a dilate algorithm, basically, we do this:
foreach (cell in cells)
    foreach (neighbour around cell)
        if neighbour is true:
            turn cell true
Using Big O notation, if we have N cells, and given S the number of expansions we perform around the cell, and 8 is the number of cells surrounding the central cell, 9 cells in total, this algorithm is:
O( N * S * 9) . Normally, S is not big, but if it were, we are near a O(N*N) which is exponential.
If you are not familiar with Big O Notation... let me give you an example. For an image of 500x500 we have 8 * 500 * 500 = 2 million operations for just one level of expansion. If we perform an expansion of 10 pixels, we have 20 million operations.
How will it be if you have to perform this operation every frame? Even worse, what if it is every FixedUpdate (zero to several times a frame). This means from 0 to N times a frame (typically 2 to 5).
I hope you understand where I'm going...
Image Processing : Kernels and Convolution
In image processing, a kernel, convolution matrix, or mask is a small matrix of float values of a given size that expresses the relation between the central cell (in the middle of the kernel) and the rest of cells around it. It is used for blurring, sharpening, embossing, edge detection, and more.
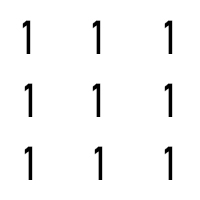
This is a 3x3 convolution matrix or kernel that considers the next cells (neighbours) as well as the central one, all with the same value:
This is accomplished by doing a convolution between a kernel and an image, this means, applying this matrix to each of the pixels in the image, with the center of the matrix in the pixel we are working on. The result of the center pixel is a combination of all those pixels around the central one, as well as the center, using the values of the kernel for each.
Using the previous kernel, typically, we sum up the values of all the surrounding pixels since all of them have value of 1 as well as the central one, and then we divide by 9 obtaining a weighted value. That will be the final value of the central pixel, so it would be similar to a "blur" operation.
If you are interested in learning more about this, I recommend this basic explanation with a list of different operations on images: https://en.wikipedia.org/wiki/Kernel_(image_processing)
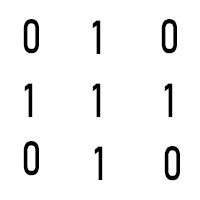
In our case, we don't have decimal values, we perform a Dilate operation with only booleans (0 or 1), not floats or colors, so I'm using a kernel of this type for a dilation of size 1:
A dilation operation, 2 times, would be the same as using this kernel of 5x5:
The center is the current cell. We consider the current cell as well as the others around. If all of them are 0, the sum is 0 and the result is 0 (false). If any of those is true, then the value is more than 0, so we the central to 1 (true).
Other people use this other kernel for a dilate operation, which only considers pixels horizontally and vertically. The results are similar.
Now that we have explained some concepts, we should understand by now that what we do is:
For each cell in our grid, we perform a convolution, so we need to check if the current cell or any of the surrounding pixels in an area given by the number of times to dilate, is true. If that's the case, we set the central cell to true.
Step 1 ) Separable Filters
We can now perform the first improvement, that gets more and more important when the kernel size is bigger, which is to check if our previous filter or kernel is separable.
A separable filter (https://en.wikipedia.org/wiki/Separable_filter) is a 2D filter (the matrix) that can be separated into two smaller filters (1D matrices), using two one dimensional filters instead, with the same result. This reduces the cost of computing that increases if the size of the kernel is big.
This means, for a 3x3 kernel or 1 level dilate you perform 9 checks (center and neighbours), but separating this into two smaller kernels of 1 dimension, you do 3 horizontals and 3 verticals, which is 6 checks. Doesn't seem like a big improvement, right? from 9 to 6 is a 1/3 improvement.
Now think about a 5 level dilation operation, that needs a 5 + 1 + 5 kernel side, a kernel of 11x11, which is 121 checks including the current cell. If you separate it into two smaller 11 size, 1D kernels, you get 22 operations instead of 121. That's a 81% of increase of performance!. The bigger is the dilate operation and the kernel, the more this change affects to the efficiency of the convolution.
Can our filter be separated? How?
Some filters cannot be separated, it is not always easy to find out. But we are very lucky that ours can! How is that possible? To start, it is always about applying the operation horizontally and then vertically, or the other way around.
In this case, it is easy to find how. We have our original grid status:
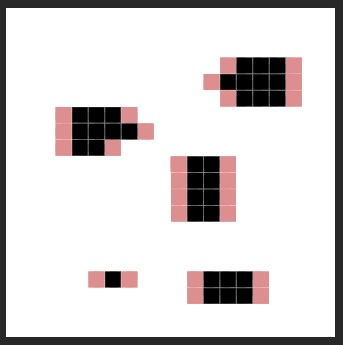
Then we apply the dilate operation horizontally using a horizontal kernel of (1,1,1), and we store the resulting grid. Pink cells are black, but I paint them pink for you to see what has been added.
On the second step, we apply the vertical kernel, of (1,1,1), to the result of the previous operation.
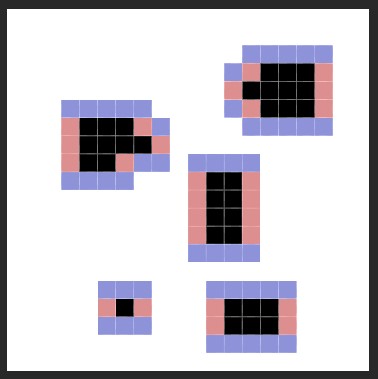
The result is exactly the same for a 3x3 kernel with 1 on all items. This happens to whatever the size of the kernel is, in this particular filter of dilation.
So instead of doing what we did on the previous algorithm, we do this instead:
// First pass (horizontal)
foreach (cell in cells)
    if cell, left neighbours, right neighbours are black:
        turn cell black (in an auxiliary array)

// Second pass (Vertical)
foreach (cell in cells)
    if cell, top neighbours, bottom neighbours are black:
        turn cell black (in the final array)
The difference is that we need now two arrays, but the efficiency will be a lot bigger.
This is the original algorithm with the separability improvement. I have two methods, the main public one and the private one that performs one dilate level. SampleData is a wrapper I made for the array so that I could access the x and z coordinates of a cell instead of using just one index. Inside the one dimension index is calculated.
public static void Dilate(ref SampleData values, ref SampleData auxArray, int minX, int minZ, int maxX, int maxZ, int times)
{
for (int i = 0; i < times; i++)
DilateOneLevel(ref values, ref auxArray, minX, minZ, maxX, maxZ);
}
private static void DilateOneLevel(ref SampleData values, ref SampleData auxArray, int minX, int minZ, int maxX, int maxZ)
{
// Horizontal sweep
for (int z = minZ; z <= maxZ; z++)
for (int x = minX; x <= maxX; x++)
{
// true if current true, left true or right true and inside limits
bool newValue = values[x, z] || (x > minX && values[x - 1, z]) || (x < maxX && values[x + 1, z]);
auxArray[x, z] = newValue;
}
// Vertical sweep
for (int z = minZ; z <= maxZ; z++)
for (int x = minX; x <= maxX; x++)
{
// True if current true or top or bottom true and inside limits
bool oldValue = values[x, z];
bool newValue = auxArray[x, z] || (z > minZ && auxArray[x, z - 1]) || (z < maxX && auxArray[x, z + 1]);
values[x, z] = newValue;
}
}Step 2) Paralellism Initial Setup for Jobs
So the second step to improve efficiency is to check if our algorithm can be concurrent somehow.
Our example is very easy, we are writing on each cell, and only reading on the surrounding cells. Reading is always safe. Writing is not. So if each thread of execution is performing this operation on each cell, there will be no conflicts, two threads of execution will never write on the same cell. This algorithm is easily parallelizable.
We give each thread of execution just one cell, it reads the surrounding ones using the separable kernel, and write the result on the same cell it was given. That's it.
For this, we will use the Unity Jobs System.
First we need to add the "Jobs" package to our project. It will be needed from now on. Open Window / Package Manager, check that you have selected "All packages" in the dropdown list on top, and wait for it to load. Also, if you are in older versions of Unity 2018 and 2019, the package can be still a "preview package", so it is not available in the list unless you click on the Advanced dropdown and enable "show preview packages". Find "Jobs" package, and check if the "install" or "upgrade" button on the bottom right is available. In that case you have to install it.
We will have to create several data structures that need another package called "Collections", so install it too.
Step 3) Creating our Data for the Job
Now that we have all the setup done, we can start writing code. Jobs need other types of data. Specifically a type of data that is made out of what is called "blittable types". Read more about blittable types here.
What do we have? We have an array of cells. Each cell contains a bool. We had a basic bool[] array with a given, which is sizeX * sizeZ of the grid in 2D.
We start with a simple function that cleans the array and sets all to false.
public static void Clean()
{
    for (int index = 0; index < _dataSize; ++index)
        _data[index] = false;
}
Now we need to convert this _data array to a new type called NativeArray. It works the same way a C# List does, so we declare it like this:
NativeArray<bool> _data;
In our start() method we need to create the instance:
_data = new NativeArray<bool>(_dataSize, Allocator.Persistent);
The second parameter is optional, but in our case we will use Allocator.Persistent among other options because we want this array to stay alive forever in our application. Other types of jobs require data that is created and deleted for just this operation.
Important note: When using Native structures, we need to delete the data by hand. We can't rely on the garbage collector anymore!. After using the data, in our Destroy() method, or whenever you stop using it, don't forget to call: array.Dispose();, otherwise you will end up having memory leaks.
But we have a problem. Bool is not blittable. In the link of blittable types, you will see Boolean is not there. In fact, booleans have not the size of 1 bit as you may think, but it surprisingly takes the same amount of data as an Integer (1 byte). Read this interesting insight about why the bool type is bigger.
From a great blog post from Player One Studio, I took the implementation of my own boolean inside a struct, so that I can use it seamessly as a normal bool, but inside of it there is a blittable type, a byte, the smaller size you can find of blittable data.
[System.Serializable]
public struct boolean
{
    public byte boolValue;

    public boolean(bool value)
    {
        boolValue = (byte)(value ? 1 : 0);
    }

    public static implicit operator bool(boolean value)
    {
        return value.boolValue == 1;
    }

    public static implicit operator boolean(bool value)
    {
        return new boolean(value);
    }

    public override string ToString()
    {
        if (boolValue == 1)
            return "true";

        return "false";
    }
}
So now my native array will use boolean instead of bool:
NativeArray<boolean> _data;
_data = new NativeArray<boolean>(_dataSize, Allocator.Persistent);
Step 4) Creating the Job
Now we have to create a job data struct. There are several Interfaces for several types of job, but the one we are interested in is IJobParallelFor, which is the definition of a job used inside a one dimension for loop that is going to run parallel on several items at the same time given an index for each of them, which is assigned automatically by the scheduler for each thread to compute it.
Let's create a simple job that, when executed, sets all the array items to false like the one before. Think about what each thread should do by itself and implement the Execute function that works for just one item. Each execution thread will take one item, set it to false, and exit.
public struct CleanJob : IJobParallelFor
{
    public NativeArray array;

    public void Execute(int index)
    {
        array[index] = false;
    }
}
Inside we define
- the array that is going to be passed to this job again.
- The Execute() function is needed and will the the one that is executed for each item on the list.
- The index will be set by the job scheduler when we give it the job for each item on the original array. Remember to only write on that index, and read from the rest if you need it.
Now we have to instantiate the job and launch it. We will call a method called Clean() inside our MonoBehaviour:
private void Clean()
{
    // Set up the job data
    CleanJob cleanJobData = new CleanJob();
    cleanJobData.array = _data;

    // Schedule the job
    JobHandle handle = cleanJobData.Schedule(_dataSize, _batchSize);

    // Wait for the job to complete
    handle.Complete();
}
For this we have to:
- Create an instance of the Job data struct.
- Assign the variables inside the struct, all of them should have values when scheduled (in this case, we only need the native array)
- Then tell the job to Schedule and store the result handle, given the size of the array data (so that it generates all indices from 0 to _dataSize - 1) and the size of each batch of indices asigned to each processor.
- Call the Complete() function for the handle to tell the main thread to wait for all of them to complete and continue working.
Batch size and Job computation length
The size of batch given can be 1, but it is better for most of the cases to be higher. You will have to experiment, but you have to think about the "difficulty" of the job computation. If it's a very big operation, divide in smaller batches of 2 or 4. If you have a very small operation like this, find a point where increasing it is no different in efficiency (in fact, can be slower, so be careful). Always use the Profiler to check how does Clean() perform in your execution.
A small operation like this can't be improved using jobs for a decent amount of items in the array. Creating jobs for such small operations will not improve efficiency, but I did it for the sake of giving you an example. It could even make it slower, so always try to create jobs for tasks that really need it. If you run this, you will see no improvement at all for an array of 200. But if you have an array of 10.000 the difference is visible. So always have the batch size and the size of the array as external parameters in the editor and test with different setups.
For our full example of dilation, here's the result of doing the same thing but with a longer operation:
In our MonoBehaviour:
private void Dilate()
{
    // Set up the job data
    DilateJob jobData = new DilateJob();
    jobData.input = blockedSamplesData; // The input data will be stored here
    jobData.output = auxArrayData; // The output data will be stored here
    jobData.arraySizeX = X;
    jobData.arraySizeZ = Z;
    jobData.dilateSize = size;

    // Schedule the job
    JobHandle handle = jobData.Schedule(X * Z, batchSize);

    // Wait for the job to complete
    handle.Complete();
}
In our Job struct definition:
public struct DilateJob : IJobParallelFor
{
    [ReadOnly] public NativeArray input;
    public NativeArray output;

    public int arraySizeX;

    public int arraySizeZ;

    public int dilateSize;

    public void Execute(int index)
    {
        // Calculate the two dimensions indices for this cel
        int indexX = index / arraySizeX;
        int indexZ = index % arraySizeZ;

        // Ignore already true values
        bool currentValue = input[index];
        if (currentValue)
            return;

        // Move around this cell, the size of dilation we want
        for (int z = indexZ - dilateSize; z <= indexZ + dilateSize; z++)
            for (int x = indexX - dilateSize; x <= indexX + dilateSize; x++)
            {
                // Take care of the borders, ignore it if we go outside!
                if (x < 0 || x >= arraySizeX || z < 0 || z >= arraySizeZ)
                    continue;

                // Find the one dimension index
                int currentCell = z * arraySizeZ + x;

                // If we found a "true" cell around the center one, we set this to true and exit.
                if (input[currentCell])
                {
                    output[currentCell] = true;
                    return;
                }
            }
    }
}
Don't forget that the destroy method of our MonoBehaviour would be:
private void OnDestroy()
{
    blockedSamplesData.Dispose();
    auxArrayData.Dispose();
}
Step 5) Improving Compilation Using Burst
Burst together with Jobs will help improve efficiency even more. Using Jobs and not using Burst makes no sense, it is specifically used for improving Job efficiency. From the documentation:
Burst is a compiler, it translates from IL/.NET bytecode to highly optimized native code using LLVM. It is released as a unity package and integrated into Unity using the Unity Package Manager.
To add burst to your project you have to do the same as with Jobs or Collections. It is a package that you have to install using the Package Manager window. Remember to enable the complete list and show the preview packages on the Advanced dropdown to find it, depending on your version of Unity. Then click install to add it to your project.
After that, you have to visit a menu that you probably didn't notice until now. Jobs/ menu is added to the top bar of Unity. You will also find that a Burst submenu has also been added. Turn on the Burst Compilation and the Synchronous compilation too.
My recommendation is that, to check efficiency using the profiler, it is better to disable JobsDebugger and the Safety Checks, but it's good to enable them to see if there's any error detected.
To use burst with this example, you have to add this line over the job struct definition of whatever you want to compile using Burst:
[BurstCompile(CompileSynchronously = true)]
public struct CleanJob : IJobParallelFor
...
All this is also explained very well on the official manual of Burst. Select your current version of Burst to find there all the information you need.
In my code I added a checkbox in the editor to enable and disable jobs to see the difference. To do this, you have to create the Job as well as the normal function, to execute both and compare. The result is what you already saw.
Don´t forget that you have now an interesting section on the bottom of the profiler that will show the "Jobs". Now you can see how it is being executed and see if there are many empty spaces of threads waiting or the batch size and the job size is well balanced, and optimize it as much as you can.
Notes about handles and job scheduling
I just wanted to mention that it is important to understand the data flow you have. It is good to have realtively small taks like the dilate one, and think if you need the result of the previous step for the next step and they can be run in paralell or not to continue working on the data. You have to be careful when using the Handle and calling Complete().
Complete() tells the main thread to wait for all threads to finish. That would absolutely kill the efficiency if you perform several steps to the same data and call Complete() after each of them. Some threads could finish all steps faster than others and help out again.
It will be faster if you pass the handle to the next job. Schedule() has a definition that receives a handle too, telling it to take the data returned by the previous job and making it "dependent" of the previous one. And at the end call Complete(). That will paralellize not only each step but all of the data stream making it a lot faster.
You can learn a lot from here, so read more about it in JobHandle description in the official manual.
The End
That's it for today. I hope it was as useful as it was to me to learn all these concepts. I've been looking to spend a while on these concepts and I needed it for a project, so it was finally the time. I wrote this article in order to keep these examples in my mind and share with others. Please, let me know if you find any problem or you have any question about this. Thanks!